Showing posts with label diy. Show all posts

Friday, August 21, 2015

Going from Pink hair to Ash Blonde


Well first things first. Pink seems to be the next trending color after the whole "silver fox" thing everybody has got going on. With the the top majority of women dying their hair , go figure that pink would be a go to color.It represents all things girly and an excellent bold go to color. What nobody ever tells you is that it is probably one of the most difficult colors to remove from your hair . Without loads of bleach and developers and toners, you are almost certainly heading for a hair disaster. Below is my story on how I went from a brunette,to a yellowish blonde, to a very light blonde,to cotton candy pink, fushia and then eventually to a nice Ash Blonde.This is not a "How to", just simply my trial and errors on what I did and how I fixed it myself.Anyone attempting to follow this ,your results may vary.


This is my original hair color to begin with.Undyed.

Going From Dark Brown To Pink 


So I started out with some store bought bleach because my Sallys is way across town and in the rush of wanting to dip dye my hair ,didn't see anything wrong with this path. I used
You want to get your hair to the lightest shade of yellow possible.Now being that I am naturally a dark haired gal, this session took 2 go's.(Make sure you saturate your hair in coconut oil for a few hours a day before,or the day of before bleaching to help protect your hair from the harsh chemicals) After that I used a little bit of toner and the result was this.
After looking through  god knows how many shades of Pink, and taking the rate my hair would get damaged by going through another process of dye, I decided to stay safe and use some semi permanant color .I went with Manic Panic Cotton Candy Pink.I left this on my hair for about an hour ( the lighter your hair color the better the results, and the longer leave in time, the better results as well) 
So for the first week or so I loved this color, but then the color faded reeeeeally fast and my hair turned a peachy color.It just wasn't enough pink to satisfy my daring side.I needed MORE PINK!
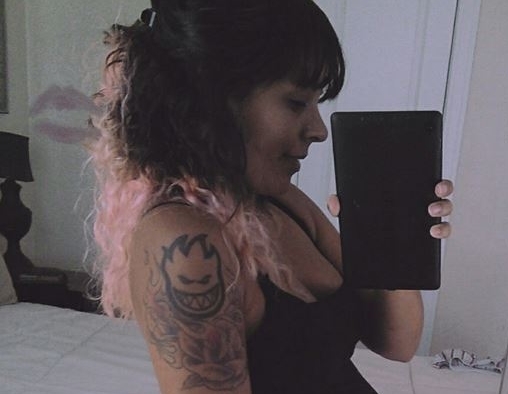

Going through all the colors again I came across a nice deep and bold Pink.Manic Panics Cleo Rose.Left it in for 3 hours.Fell in Love. The pictures don't even do it justice.
Loved loved loved it!
The key was to wash with cold water, only 2-3 times a week,(Using dry shampoo will be your best friend during temp colorations like this) with your head upside down so the top doesn't fade as fast ,try to avoid conditioner as much as possible, and in between add a small amount here and there to keep the color touched up and bold.The problem now was trying to get my wardrobe to match my funky do. After about 2 months of rocking Miss Cleo, it was about time to say goodbye.

Going from Pink to Ash Blonde

 So after getting bored of pink , I decided o.k., I got a little crazy out of me,time to tone it back down.I tried every method under the sun for removing pink hair ,without having to resort back to the bleach (or the bleach bath method).I tried everything in my cabinets and under the counter, even dish soap with baking powder.This was about the best I could get it, because of how deep this color was.
Being in too much of a rush and wanting to surprise my fiance (who absolutely hated the pink btw) I needed to move fast.So I said screw it and threw in a box of store bought dye,again, crossed my fingers and hoped for the best.
                                               Revlon Colorsilk Dark Ash Blonde
Because the color sits on top of bleached hair and not inside, the pink started to strip and disappeared almost instantly!
Still having not washed my hair out yet, I wasn't certain it was going to work.
This is what I got,Hair is really wet.No signs of pink.

Hair is halfway dry and it's starting to look a little lighter.

Hair is dried, styled and good to go.Color is on point.
No pink left behind, and I didn't have to damage my hair with more bleach!


Tuesday, March 31, 2015

Easy Coconut Milk Shampoo & Face Mask


                                                    Quick and Easy Coconut Milk Shampoo

Coconut Milk has many health benefits.This article in particular will be focusing on the benefits for your hair and skin. Coconut is not to be confused with coconut water. The milk is derived from the meat of a mature coconut. The milk is filled with proteins, thus providing your hair with the nutrients for it to grow long,strong and shiny.It aids in nourishing dry scalps and detangling hair, and because it is not greasy, it can be worn as a leave in conditioner. Coconut milk is also a great moisturizer for the skin. It can help in certain skin disorders and excessive dry skin. Because coconut milk is also filled with copper and vitamin C , it acts as an anti-aging agent,reducing wrinkles,age spots and restoring elasticity back to the skin.
                                                                       
                            
                                                                 Ingredients & Supplies
1/3 cup of Coconut Oil
6 oz (3/4 cup) coconut milk - any brand will do just fine.
1/2 cup honey
(For thicker results add more honey.Careful as honey is a natural hair lightener.)


  Instructions
Blend all these ingredients together in your blender of choice ( I use the whipping tool on my Magic Bullet for a moose kind of effect)
Blend for about 2 minutes.


Switch to an empty shampoo bottle,soap bottle, or a spray bottle.I used a leftover mason jar,cut a hole in it and glued a soap dispenser top onto it ( You can find that DIY project on Pinterest) 
Now its just time for a washing and a growing!
Because of the consistency of the mix ,only use a half quarters worth to your hair,maybe a little more if you have thick hair. It will NOT lather so adding more and more to your hair will not help.
Use  4-5 times a week.
 When done, place mixture into the refrigerator for storage. 

* For long term usage just take your mixture and freeze it in an ice tray,when frozen ,take them out and store them in a container in your freezer. Take one cube out for each usage.

* Pour the remaining coconut milk that wasn't used into a spray bottle for a leave in conditioner or use to make the face wash below.


 Just as Simple Coconut Face Mask/Wash


Adding coffee to this blend makes for an incredibly refreshing face mask/wash.Caffeinated Coffee is full of antioxidants that fight free radicals in your skin cells .It works great as an exfoliate and helps lessen the appearance of dark circles under the eyes and lines around the eyes,forehead and mouth.


  Ingredients & Supplies

        1/4 cup of coffee grinds
1/4 cup honey 
1/4 cup of coconut milk
(this batch is for a weeks worth, adjust for however much you need)
Mix all your ingredients together in a bowl or small container.Apply to face and let sit for 15-20 minutes.Wash off.Won't leave any color behind but you will smell like a fresh cup of coffee.:)
Perfect for doing first thing in the morning to wake me up!
Do this 1-3 times a week. 
For in between rinses, dip cotton ball into coconut milk and dab on face . Leave for 2 minutes and rinse off.


Enjoy and Experiment if you'd like by adding essential oils to you shampoo or even applying mask to other parts of your body.Would be excellent for a body wrap!
Stay tuned for more recipes for your hair and face.


Instagram: @beautifullymixedmutt